Stop guessing which marketing actually works—set up simple lead source tracking in under an hour
You've just spent £200 on Facebook ads and another £150 on a local directory listing. Three new enquiries came in this week. Success, right?
But here's the uncomfortable question: which channel did those leads actually come from?
If you can't answer that with certainty, you're flying blind. You might be doubling down on a channel that's delivering nothing whilst neglecting the one that's actually working. Before you spend another pound on marketing, you need to know where every single lead originates.
The good news? You don't need expensive software or technical expertise. You need three simple tracking methods: Digital tracking (UTM parameters for online links), Dedicated offline tracking (unique contact methods for print and directories), and Manual logging (a required question in your intake process).
This guide walks you through implementing all three pillars so you'll finally know which marketing deserves more investment and which is wasting your money.
Jump to:
Quick Start: Implement Basic Tracking (10 Minutes)
This quick version gets your foundation in place. You'll set up one digital tracking link, one offline tracking method, and add the essential field to your lead records.
Step 1: Define Your Core UTM Parameters
You need three pieces of information for every trackable link:
- •Source: Where the link appears (facebook, newsletter, linkedin)
- •Medium: The type of traffic (social, email, paid)
- •Campaign: What you're promoting (spring-sale, new-service-launch)
Keep it simple. Use lowercase, no spaces (use hyphens instead).
Step 2: Create Your First Trackable Link
Visit a free UTM builder (Google's Campaign URL Builder or utm.io). Enter:
- •Your website URL
- •Source: facebook
- •Medium: social
- •Campaign: bio-link
Copy the generated URL. This is now trackable.
Step 3: Add a "Source" Field to Your Lead Tracking
Whether you use a spreadsheet or CRM, add a new column or field called "Lead Source". This is where you'll record where each enquiry came from.
Step 4: Create One Unique Offline Contact Method
Set up a simple email alias for one offline channel. If you're running a print ad, create `printoffer@yourbusiness.com` that forwards to your main inbox. When enquiries arrive there, you know the source.
Step 5: Test Both Methods
Click your UTM link and submit an enquiry through your website. Send a test email to your new tracking address. Check your analytics and lead records to confirm the source information appears correctly.
✅ Completed the quick version? You now have the foundation of attribution tracking. Move on to Monthly Marketing Review Routine to start using this data, or continue below for the detailed walkthrough of all three tracking pillars.
Complete Step-by-Step Guide: The Three Pillars of Lead Tracking
This builds on understanding your potential metrics from Calculate Your Cost Per Lead and Cost Per Customer. Now you'll implement the systems to actually measure those numbers in real life.
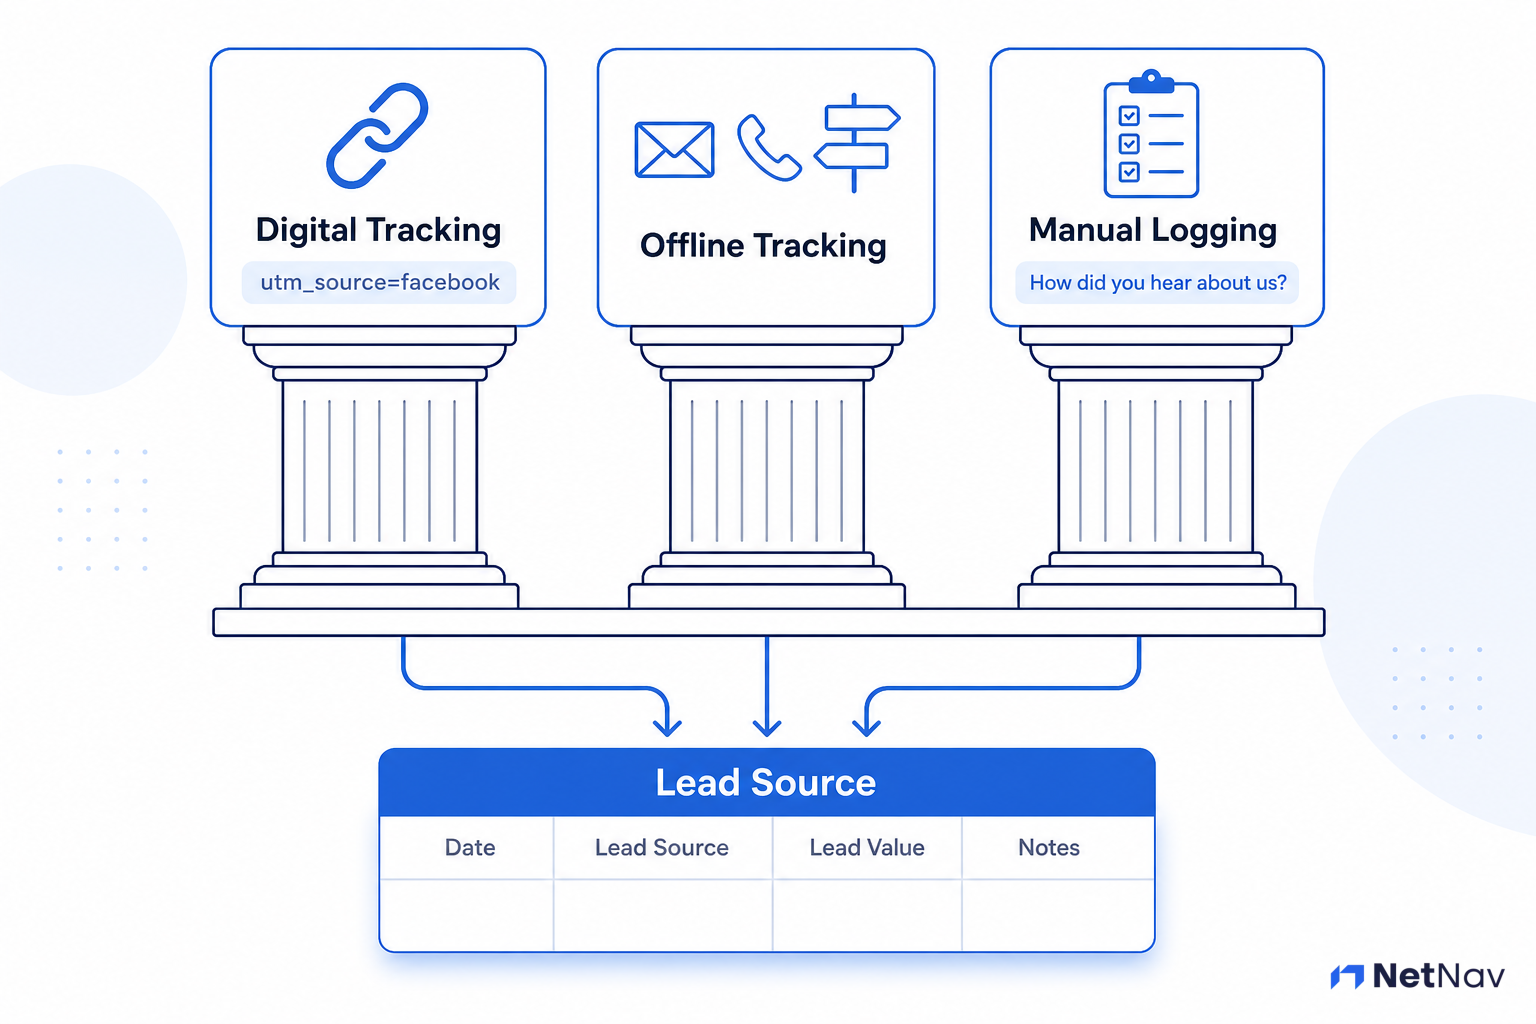
The Three Pillars of Lead Tracking: Digital, Offline, and Manual logging
Pillar 1: Digital Tracking with UTM Parameters
UTM parameters are tiny bits of code added to the end of your URLs that tell analytics tools where traffic came from. They look technical but they're remarkably simple to create.
Understanding the Three Core Parameters
Every trackable link needs three pieces of information:
- utm_source: The specific platform or publication (facebook, google, newsletter-june)
- utm_medium: The broad category of traffic (social, email, paid, referral)
- utm_campaign: What you're promoting (spring-sale, webinar-signup, new-product)
There are two optional parameters (utm_term for paid search keywords and utm_content for A/B testing), but ignore those for now. The core three are all you need.
Setting Your UTM Rules
Consistency is everything. Establish these rules now:
- •Always use lowercase. "Facebook" and "facebook" are treated as different sources in analytics.
- •Use hyphens, not spaces. Write "spring-sale" not "spring sale"
- •Be specific but not obsessive. "facebook-post-march-12" is too granular. "facebook" is perfect.
- •Document your naming conventions. Keep a simple list of the source names you use so everyone on your team uses identical terms.
Creating Your UTM Links
Use a free UTM builder tool. Google's Campaign URL Builder is reliable, or try utm.io for a cleaner interface.
For every external link you share (paid ads, email campaigns, social media bio links, guest blog posts), create a UTM-tagged version:
- Enter your destination URL (where you want people to land)
- Fill in source, medium, and campaign
- Copy the generated URL
- Use this tagged version everywhere
Example: You're posting about your new service on Facebook.
- •Destination URL: https://yourbusiness.com/new-service
- •Source: facebook
- •Medium: social
- •Campaign: new-service-launch
- •Generated URL: https://yourbusiness.com/new-service?utm_source=facebook&utm_medium=social&utm_campaign=new-service-launch
That's it. When someone clicks that link, Google Analytics records the source automatically.
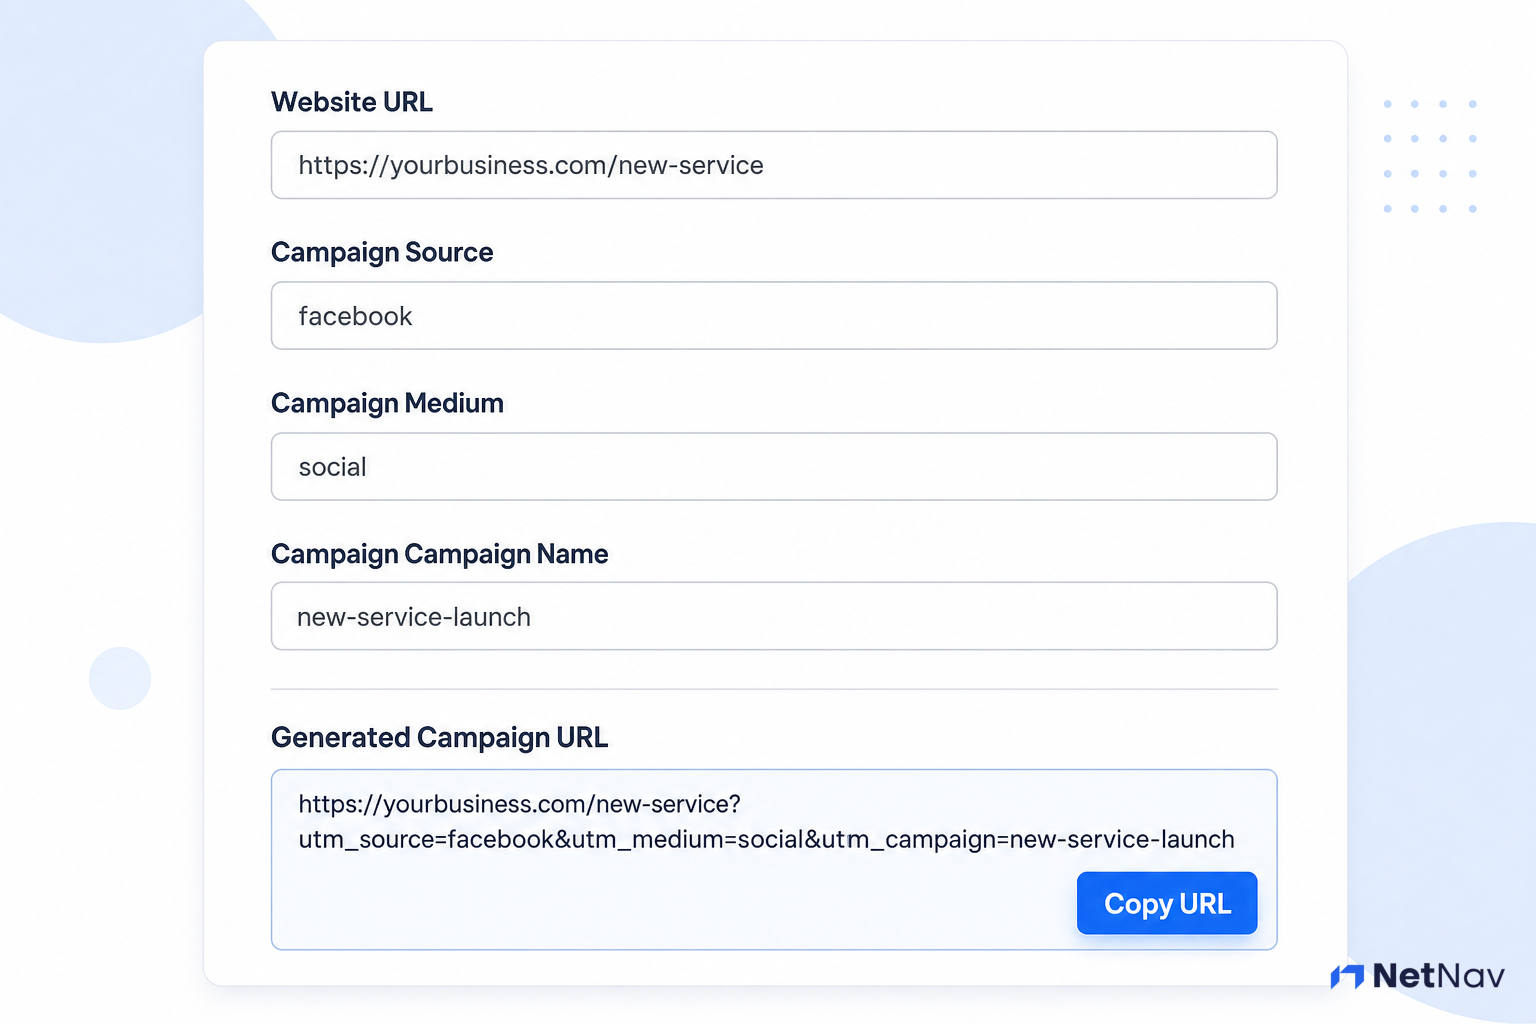
Using a simple, free UTM builder tool to quickly create trackable links
Where to Apply UTM Parameters
Tag every link you control outside your website:
- •All paid advertising (Facebook Ads, Google Ads, LinkedIn Ads)
- •Email marketing campaigns
- •Social media bio links and posts
- •Guest articles or partnerships
- •QR codes that lead to your website (yes, these work for digital tracking of offline materials)
Don't tag:
- •Internal links (links between pages on your own website)
- •Organic search results (Google already tracks this)
- •Links in printed materials without QR codes (use Pillar 2 instead)
Making Ugly Links Presentable
UTM links are long and intimidating. Use a link shortener like Bitly or TinyURL after generating your UTM. This gives you a clean, short link that still contains all the tracking data.
Original: `https://yourbusiness.com/new-service?utm_source=facebook&utm_medium=social&utm_campaign=new-service-launch`
Shortened: `https://bit.ly/newservice`
The tracking still works perfectly, but the link looks professional.
If you're applying UTM parameters to paid search links, most advertising platforms (Google Ads, Facebook Ads) have built-in UTM fields so you don't need to manually create the links.
Pillar 2: Dedicated Contact Methods for Offline and Directory Listings
UTM parameters only work for clickable digital links. What about print ads, local directories, networking events, or physical flyers?
You need dedicated, trackable contact methods for each offline channel.
Method 1: Unique Email Addresses
Create email aliases (forwarding addresses) for different offline sources:
- •`printoffer@yourbusiness.com` for print advertising
- •`directory@yourbusiness.com` for local business directories
- •`event@yourbusiness.com` for networking events
All these forward to your main inbox, but when an enquiry arrives, you instantly know the source.
Most email providers (Google Workspace, Microsoft 365, even basic hosting) allow unlimited aliases at no extra cost.
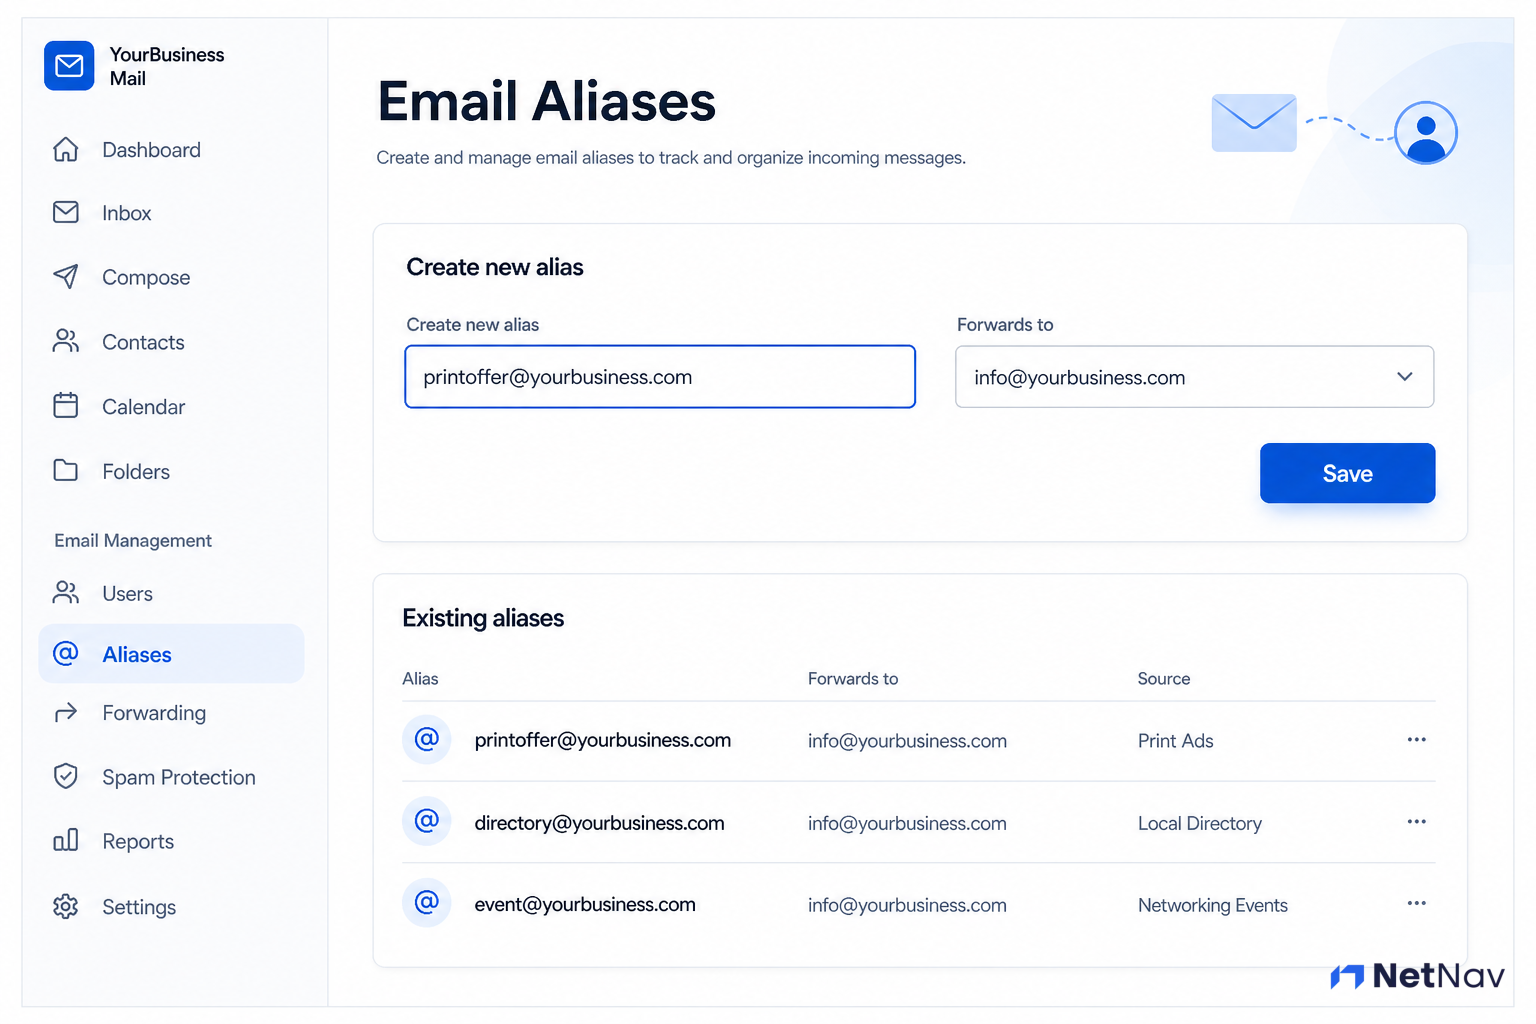
How to set up an email alias for tracking print ads
Method 2: Dedicated Phone Numbers
Virtual phone numbers are inexpensive (often under £5/month) and forward to your main number. Assign different numbers to different channels:
- •One number for print ads
- •One number for your vehicle signage
- •One number for a specific directory listing
Services like Grasshopper, Google Voice (in supported regions), or your VoIP provider can set this up in minutes.
Method 3: Unique Landing Pages
Create specific landing pages for offline campaigns. Instead of sending people to your homepage, send them to:
- •`yourbusiness.com/print-offer`
- •`yourbusiness.com/directory-special`
- •`yourbusiness.com/event-signup`
These pages can be identical to your main service page—the URL is what matters for tracking. You can create these easily without technical skills using the methods in Create Simple Landing Pages Without a Developer.
Method 4: Promo Codes
For offers or discounts, use unique codes for each channel:
- •PRINT20 for print advertising
- •LOCAL15 for local directory listings
- •EVENT10 for networking events
When someone uses the code, you know exactly where they found you.
Implementing Offline Tracking
- List your offline channels. Print ads, directories, vehicle signage, networking events, physical flyers—write them all down.
- Assign a tracking method to each. Email alias for print, unique phone for vehicle signage, landing page for directories, etc.
- Set up the tracking assets. Create the email aliases, purchase virtual numbers, or build the landing pages.
- Update your materials. Use the new contact methods in all future offline marketing.
- Document the system. Keep a simple list: "printoffer@yourbusiness.com = Print Ads" so everyone knows what each method represents.
NetNav Integration Point: Setting up custom URLs and tracking pages can impact site health if done incorrectly. This is one of the infrastructure checks NetNav runs automatically across your whole site to ensure new tracking assets don't generate broken links or speed issues.
Pillar 3: Manual Attribution and Centralization
Digital tracking and dedicated contact methods catch most leads, but some will still slip through. Someone might call your main number, email your general address, or walk into your premises.
You need a manual backup: the "How did you hear about us?" question.
Implementing the Required Question
Add this field to every lead intake point:
In your contact forms: Add a required dropdown field with options:
- •Google Search
- •Email Newsletter
- •Print Ad
- •Local Directory
- •Referral (Friend/Family)
- •Existing Customer
- •Other
In your CRM or spreadsheet: Add a mandatory "Lead Source" column that must be filled before a lead record is saved.
For phone enquiries: Create a simple script for whoever answers:
> "Thanks for calling! Before we get started, may I quickly ask how you heard about us? It really helps us understand what's working."
Most people answer happily. If they don't remember, record "Unknown" rather than guessing.
For in-person enquiries: Train your team to ask casually during the conversation. "Out of interest, how did you find us?" works well.
Making It Mandatory
The question only works if it's actually asked every time. Make it non-negotiable:
- •Set contact form fields to "required"
- •Add the question to your phone script checklist
- •Make the CRM field mandatory (it won't save without an answer)
- •Review lead records weekly and follow up on any missing source data
Centralizing Your Lead Data
All three tracking pillars feed into one central system. Whether you use a simple CRM for organizing this data or a spreadsheet, you need these core fields:
- Date: When the enquiry arrived
- Lead Source: Where they came from (from UTM, dedicated contact method, or manual question)
- Lead Value: If they became a customer, what was the sale value?
- Notes: Any relevant context
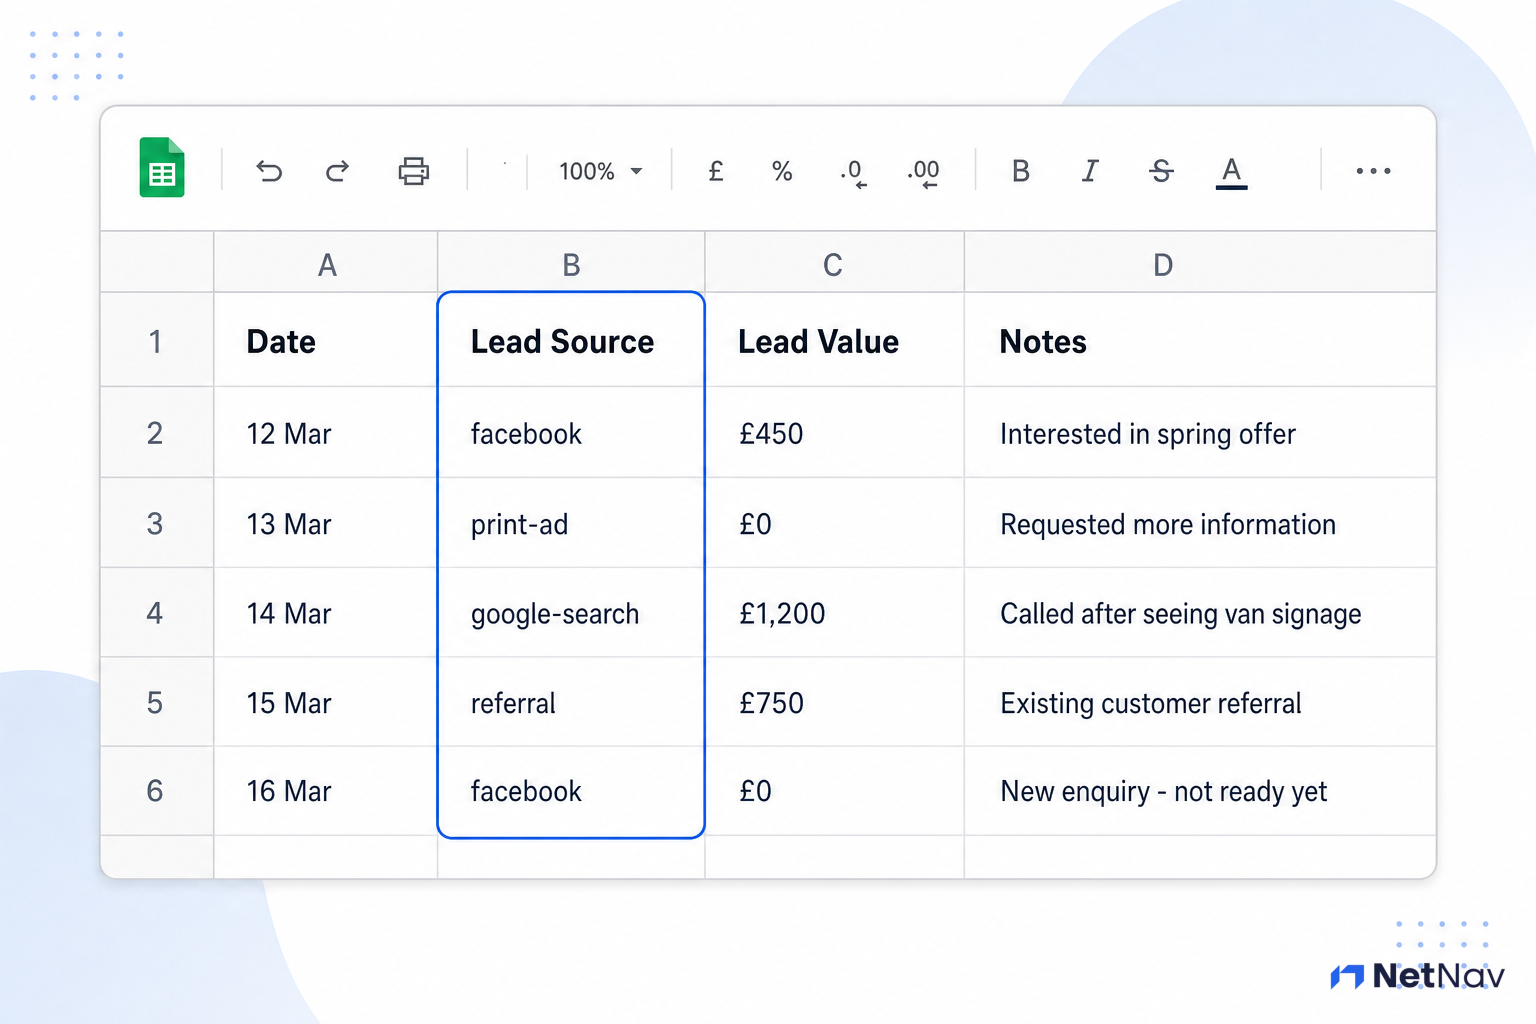
The mandatory fields you need to track lead source in your simple CRM or spreadsheet
Connecting the Dots
Your UTM data lives in Google Analytics. Your dedicated contact methods and manual questions live in your CRM or spreadsheet. Connect them:
Weekly routine (5 minutes):
- Check Google Analytics for UTM source data (Acquisition > Traffic Acquisition)
- Check your dedicated email aliases and phone numbers for new enquiries
- Review your CRM/spreadsheet for manually logged sources
- Ensure every new lead has a recorded source
This weekly check ensures nothing falls through the cracks.
What About Multi-Touch Attribution?
Someone might see your Facebook ad, then Google your business, then call the number from your website. Which source gets credit?
For micro-businesses, don't overcomplicate this. Use "last-click attribution"—give credit to the final touchpoint before they enquired. It's not perfect, but it's simple and actionable.
If you want to understand the full customer journey across multiple touchpoints, see our in-depth guide on Marketing Attribution: Which Channel Is Really Working?.
🎉 Completed? You now have actionable data flowing in. This is the bedrock of smart marketing. You're ready for Monthly Marketing Review Routine to start analyzing this data and making informed decisions about where to invest your time and money.
Troubleshooting Lead Tracking Issues
Problem: Team members forget to ask "How did you hear about us?" and lead source data is missing. Fix: Make the question mandatory in your intake process. Add it as a required field in contact forms, include it in your phone script checklist, and make the CRM field non-saveable without an answer. Review weekly and follow up on missing data.
Problem: The data I'm seeing in my spreadsheet doesn't match what Google Analytics shows. Fix: Check three things: (1) Ensure all UTM parameters are strictly lowercase with no spaces, (2) Verify GA4 is filtering out internal traffic (your own testing clicks), (3) Remember that GA4 shows website visits whilst your CRM shows actual enquiries—these numbers should be different. Not everyone who visits becomes a lead.
Problem: I set up UTM links but I can't find the data in Google Analytics. Fix: In GA4, go to Reports > Acquisition > Traffic Acquisition. Look for your utm_source, utm_medium, and utm_campaign values in the table. If they're not appearing, check that: (1) You're actually using the UTM links (not the original URLs), (2) GA4 is installed correctly (Set Up Basic Tracking with GA4), (3) You're looking at the correct date range.
Problem: I have too many lead sources and the data is overwhelming. Fix: Simplify. You don't need to track every single social media post separately. Group similar sources together: all organic social becomes "social-organic", all paid social becomes "social-paid". Focus on tracking at the channel level (Facebook vs Google vs Print) rather than the individual campaign level until you have enough volume to justify more granularity.
What's Next: Turning Data into Decisions
You're now collecting lead source data. The next critical step is actually using it.
Immediate next action: Implement Monthly Marketing Review Routine. This guide shows you exactly how to analyze your lead source data, calculate ROI for each channel, and make informed decisions about where to invest more (or cut back).
Go deeper on related topics:
- •Marketing Attribution: Which Channel Is Really Working? – For the full guide to understanding multi-touch attribution and which channel deserves credit when customers interact with multiple touchpoints.
- •Setting Up Conversion Tracking – If you want to connect your UTMs directly to specific goals in analytics (form submissions, phone calls, purchases), this guide shows you how to set up proper conversion tracking.
Other Stage 4 (Get Customers) Guides
Converting enquiries into customers:
- •Write CTAs That Actually Get Clicks – Improve the buttons and links that turn visitors into leads
- •Simple Follow-Up System for Enquiries – Never lose a lead due to slow or forgotten follow-up
- •Set Your Response Time Standard – How fast should you respond? Set a realistic standard and stick to it
- •Structure Your Discovery Calls – A simple framework for qualification calls that convert
- •Build a Simple Sales Pipeline (Free Tools) – Visualize and manage your leads from enquiry to customer
- •Your First Paid Ad Campaign (Step by Step) – Ready to spend money on advertising? Start here
Ready to Audit Your Entire Marketing Foundation?
You've successfully implemented your lead tracking system—that's a huge competitive advantage. Most micro-businesses are still guessing where their customers come from.
But lead tracking is just one piece of your marketing infrastructure. NetNav audits your entire site across 9 foundational pillars in 60 seconds—technical health, tracking integrity, conversion optimization, and more.
See what other hidden issues need attention before you double down on your newly successful marketing channels.
Run Your Free NetNav Audit Now
Next Step: Monthly Marketing Review Routine – Learn how to analyze your lead source data and make informed marketing decisions
Previous Step: Calculate Your Cost Per Lead and Cost Per Customer